Qubic RPC
The Qubic RPC (Remote Procedure Call) API provides a way for applications to interact with the Qubic blockchain without running a full node. It offers endpoints for querying blockchain data, submitting transactions, and interacting with smart contracts.
1. Available RPC Services and Documentation
- Live API - Real-time data access (interactive docs)
- Query API - Historical data and archive queries (interactive docs)
- Full Swagger Reference - Complete API reference including all services (Archiver, Query, Live, Stats)
2. Public RPC Endpoints
| Base URL | Use Case |
|---|---|
| https://rpc.qubic.org | Public RPC/API for general purposes. Use this in production applications. |
| https://rpc-staging.qubic.org | Public RPC/API for staging (production testing) purposes. Normally only for internal testing. |
Using RPC Endpoints
These endpoints can be accessed via HTTP requests (e.g., using curl, a TypeScript library, or any HTTP client). Example using curl:
curl https://rpc.qubic.org/v1/status
3. Basic API Examples
The following examples demonstrate how to use JavaScript scripts to interact with Qubic RPC APIs. These practical examples showcase common operations and provide ready-to-use code snippets for developers.
Example 1: Get Account Balance
Retrieves the current balance of a specific account using its public ID.
import { normalizeEndpoint, fetchJson } from "./common";

export async function runBalances({ rpc, publicId }) {
  const base = normalizeEndpoint(rpc);
  if (!publicId) throw new Error("Missing publicId");
  const url = `${base}v1/balances/${publicId}`;
  const data = await fetchJson(url);
  return data; // { balance: {...} }
}
Example 2: Broadcast Transaction
Sends a signed transaction (encoded in base64) to the network for processing.
import { normalizeEndpoint, fetchJson } from "./common";

export async function runBroadcastTransaction({ rpc, encodedTransaction }) {
  const base = normalizeEndpoint(rpc);
  if (!encodedTransaction)
    throw new Error("Missing encodedTransaction (base64)");
  const body = { encodedTransaction };
  const data = await fetchJson(`${base}v1/broadcast-transaction`, {
    method: "POST",
    body,
  });
  return data;
}
Example 3: Get Tick Information
Retrieves the current tick information, including the current tick number and timestamp.
import { normalizeEndpoint, fetchJson } from "./common";

export async function runTickInfo({ rpc }) {
 const base = normalizeEndpoint(rpc);
 const url = `${base}v1/tick-info`;
 const data = await fetchJson(url);

 return data; // { tickInfo: { tick, timestamp } }
}
4. Smart Contract Interaction Flow
Here's how to interact with a smart contract through RPC:
When sending data (like requestData) in POST requests to endpoints such as /v1/querySmartContract, it must be encoded in base64.
Similarly, the responseData received from such endpoints is often encoded in base64 and must be decoded to get the actual data.
-
Reading Data (Function Call):
curl -X 'POST' \
  'https://rpc.qubic.org/v1/querySmartContract' \
  -H 'accept: application/json' \
  -H 'Content-Type: application/json' \
  -d '{
  "contractIndex": 1,
  "inputType": 1,
  "inputSize": 0,
  "requestData": "<BASE64_ENCODED_DATA>"
}'
Response:
{"responseData":"AMqaO0BCDwBAS0wA"}(Note: The response is also encoded in base64. You will need to decode it to get the actual data.) -
Writing Data (Procedure Call):
- Create a transaction targeting the smart contract
- Set the appropriate function index and parameters
- Sign the transaction with your private key
- Broadcast it using
/v1/broadcast-transaction
5. Transaction Anatomy
This section provides a clear breakdown of every component that forms a valid Qubic transaction. It explains the conceptual structure, how to determine the exact input size expected by a smart contract, and how the data is serialized into a base64 payload. You’ll also see the end-to-end flow for both read-only queries and state-changing procedures, helping you understand how transactions are built, signed, and executed on the network.
Conceptual Structure
Transaction = {
    Source: Sender's public key
    Destination: Receiver/contract public key
    Amount: QUs to transfer
    Tick: Future execution moment
    Type: Function/procedure index to invoke
    Size: Data payload bytes
    Payload: Serialized data in base64
    Signature: Cryptographic authentication
}
Input Size Calculation
Fundamental principle: inputSize = sizeof(C++_input_struct)
Understanding how to calculate the input size is crucial for creating valid transactions. The input size must exactly match the size of the C++ struct that the smart contract expects to receive. This isn't just a suggestion - it's a hard requirement for transaction validity.
// Example: AddToBidOrder_input structure from QX contract
struct AddToBidOrder_input {
    id issuer;              // 32 bytes (256-bit identifier)
    uint64 assetName;       // 8 bytes (64-bit integer)
    sint64 price;           // 8 bytes (signed 64-bit integer)
    sint64 numberOfShares;  // 8 bytes (signed 64-bit integer)
};
// Total size: 32 + 8 + 8 + 8 = 56 bytes
How to calculate correctly:
- Field-by-field analysis: Examine each field in the struct and its data type size
- Memory alignment: C++ automatically aligns struct members to optimize memory access, which can add padding bytes
- Platform considerations: Most Qubic contracts assume 64-bit architecture with standard type sizes
- Documentation verification: Always cross-reference with official documentation or test with known working examples
Common mistakes:
- Ignoring padding: Assuming struct size is just the sum of field sizes without considering alignment
- Wrong data types: Confusing similar types like
uint32vsuint64orsint64vsuint64 - String handling: Misunderstanding how text data is encoded within fixed-size fields
Payload Serialization Process
Data pipeline:
Input data → C++ Struct → Raw bytes → Base64 encoding → Payload
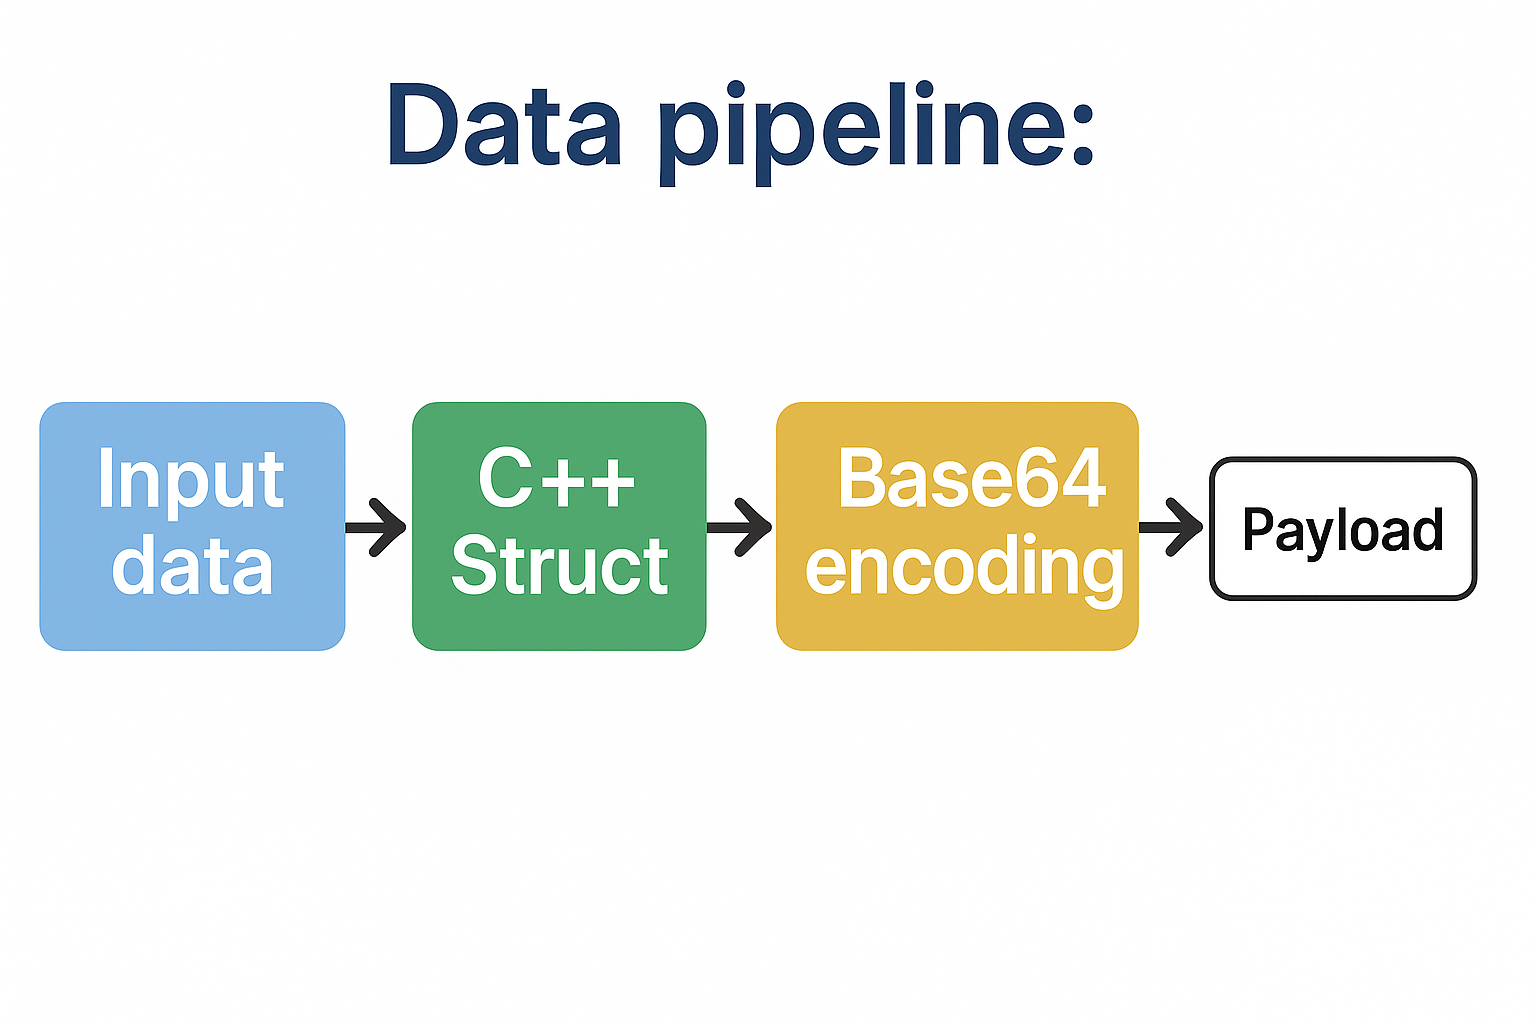
Conceptual steps:
- Data mapping: Convert input parameters to struct format
- Binary serialization: Respect exact C++ struct memory layout
- Encoding: Convert bytes to base64 for HTTP/JSON transport
- Validation: Verify size matches inputSize
Execution Flow
For Procedures (Transactions)
pseudocode:
1. get_current_tick()
2. calculate_target_tick(current_tick + offset)
3. build_payload(input_data)
4. create_transaction(destination, type, size, payload, target_tick)
5. sign_transaction(private_key)
6. broadcast_transaction(signed_transaction)
7. verify_inclusion_in_tick(target_tick, tx_id)
8. validate_expected_effects(state_changes)
For Functions (Queries)
pseudocode:
1. build_payload(input_data)
2. calculate_input_size(struct_definition)
3. send_rpc_query(contractIndex, inputType, payload)
4. decode_base64_response(result)
5. parse_output_struct(response_bytes)
6. Complete Transaction Example
This section demonstrates how to construct payloads for QX smart contract interactions. QX is Qubic's decentralized exchange (contract index 1), and these examples show the most common operations developers need to implement.
Understanding QX Operations
QX Contract Identification
Before constructing any QX transaction, you need to understand the identification system. Each contract has a numerical index, which deterministically derives into its public key (the contract address). In practice, the index serves as a shorter notation, while the contract address is used as the destination in transactions and for querySmartContract calls.
const QX_CONTRACT = {
  index: 1, // Used for RPC queries
  address: "BAAAAAAAAAAAAAAAAAAAAAAAAAAAAAAAAAAAAAAAAAAAAAAAAAAAAAAARMID", // Used for transactions
};
Procedure Numbers
QX procedures have specific numeric identifiers that you must use as inputType. These numbers correspond to the registration order in the QX contract's REGISTER_USER_FUNCTIONS_AND_PROCEDURES() section.
const QX_PROCEDURES = {
  ISSUE_ASSET: 1,
  TRANSFER_SHARES: 2,
  ADD_TO_ASK_ORDER: 5, // Sell order
  ADD_TO_BID_ORDER: 6, // Buy order
  REMOVE_FROM_ASK_ORDER: 7,
  REMOVE_FROM_BID_ORDER: 8,
};
Example: QX Bid Order
Conceptual Understanding
A bid order is how you buy assets on QX. When you place a bid order, you're saying "I want to buy X amount of asset Y at price Z". The QX contract will:
- Lock your QU in escrow (price × numberOfShares)
- Try to match your bid with existing ask orders
- If no match, keep your order in the order book until someone sells at your price
C++ Structure Analysis
Before constructing the payload, examine the C++ struct from the QX contract. This defines exactly what data the contract expects and in what order:
struct AddToBidOrder_input {
    id issuer;              // 32 bytes (PublicKey of asset creator)
    uint64 assetName;       // 8 bytes (asset name as number)
    sint64 price;           // 8 bytes (price per share in QU)
    sint64 numberOfShares;  // 8 bytes (how many shares to buy)
};
// Total size: 32 + 8 + 8 + 8 = 56 bytes
Step-by-Step Implementation
NOTE: This is a javascript example. It's only one of many ways how to do API calls.
- Step 1: Import Required Libraries
First, we need to import all the required types from the Qubic TypeScript library. These provide the essential building blocks for constructing transactions:
import { QubicTransaction } from "@qubic-lib/qubic-ts-library/dist/qubic-types/QubicTransaction";
import { PublicKey } from "@qubic-lib/qubic-ts-library/dist/qubic-types/PublicKey";
import { Long } from "@qubic-lib/qubic-ts-library/dist/qubic-types/Long";
import { DynamicPayload } from "@qubic-lib/qubic-ts-library/dist/qubic-types/DynamicPayload";
import { QubicPackageBuilder } from "@qubic-lib/qubic-ts-library/dist/QubicPackageBuilder";
- Step 2: Payload Construction Function
Now we'll build the payload construction function piece by piece.
Function signature and size calculation: We start by defining the function and calculating the exact payload size that matches the C++ struct:
function createQXBidOrderPayload({ issuer, assetName, price, numberOfShares }) {
  // Total payload size:
  // id issuer = 32 bytes
  // uint64 assetName = 8 bytes
  // sint64 price = 8 bytes
  // sint64 numberOfShares = 8 bytes
  // Total = 56 bytes
  const packageSize = 56;

  const builder = new QubicPackageBuilder(packageSize);
Adding the issuer field: The first field is the issuer ID, which is a 32-byte PublicKey representing who created the asset:
// 1. issuer (id = PublicKey, 32 bytes)
builder.add(new PublicKey(issuer));
Asset name conversion and addition: The asset name needs to be converted from a string to a uint64 number. We handle both string and numeric inputs:
// 2. assetName (uint64, 8 bytes)
// Convert string to number if necessary
let assetNameValue;
if (typeof assetName === "string") {
  // Convert string to uint64 (example: "CFB" -> number)
  const encoder = new TextEncoder();
  const bytes = encoder.encode(assetName.padEnd(8, "\0"));
  const view = new DataView(bytes.buffer);
  assetNameValue = view.getBigUint64(0, true); // little endian
} else {
  assetNameValue = BigInt(assetName);
}
builder.add(new Long(assetNameValue));
Adding price and share count: The final two fields are straightforward numeric values, both converted to BigInt to handle large numbers safely:
// 3. price (sint64, 8 bytes)
builder.add(new Long(BigInt(price)));

// 4. numberOfShares (sint64, 8 bytes)
builder.add(new Long(BigInt(numberOfShares)));
Creating the final payload: Finally, we package all the data into a DynamicPayload object that can be used in the transaction:
  const payload = new DynamicPayload(packageSize);
  payload.setPayload(builder.getData());

  return payload;
}
- Step 3: Complete Transaction Function
Now we'll build the main transaction function that puts everything together.
Function signature and payload creation: We start by accepting all the necessary parameters and creating the payload using our helper function:
export async function runQXBidOrder({
  rpc,
  seed,
  sourcePublicKey,
  contractAddress,
  issuer,
  assetName,
  price,
  numberOfShares,
  targetTick,
}) {
  // Create payload for AddToBidOrder (inputType 6)
  const payload = createQXBidOrderPayload({
    issuer,
    assetName,
    price,
    numberOfShares,
  });

  // Calculate total amount (price * numberOfShares)
  const totalAmount = price * numberOfShares;
Building the transaction: Next, we construct the QubicTransaction object with all the required fields. The amount represents QU that will be locked in escrow:
// Create transaction
const transaction = new QubicTransaction()
  .setSourcePublicKey(new PublicKey(sourcePublicKey))
  .setDestinationPublicKey(new PublicKey(contractAddress))
  .setTick(targetTick)
  .setInputType(6) // AddToBidOrder
  .setInputSize(payload.getPackageSize())
  .setAmount(new Long(BigInt(totalAmount)))
  .setPayload(payload);
Signing and broadcasting: Finally, we sign the transaction with the private key (derived from seed) and broadcast it to the network:
// Sign transaction
await transaction.build(seed);

// Send transaction
const result = await broadcastTransaction(transaction, rpc);
Return structured response: The function returns detailed information about both the transaction and the broadcast result:
  return {
    transaction: {
      sourcePublicKey,
      destinationPublicKey: contractAddress,
      tick: targetTick,
      inputType: 6,
      amount: totalAmount,
      inputSize: payload.getPackageSize(),
    },
    payload: {
      issuer,
      assetName,
      price,
      numberOfShares,
    },
    broadcast: result,
  };
}
- Step 4: Broadcast Helper Function
The broadcast function handles the actual network communication.
Transaction encoding: First, we encode the signed transaction to base64 format for HTTP transmission:
async function broadcastTransaction(transaction, rpcUrl) {
  const encodedTransaction = transaction.encodeTransactionToBase64(
    transaction.getPackageData()
  );

  const request = {
    encodedTransaction: encodedTransaction,
  };
Network request: Then we send the encoded transaction to the Qubic RPC endpoint:
const response = await fetch(`${rpcUrl}v1/broadcast-transaction`, {
  method: "POST",
  headers: {
    "Content-Type": "application/json",
  },
  body: JSON.stringify(request),
});
Error handling and response: Finally, we check for HTTP errors and return the JSON response:
  if (!response.ok) {
    throw new Error(`HTTP error! status: ${response.status}`);
  }

  return await response.json();
}
Usage Example
Here's how to use the complete implementation with real working values:
// Buy 100 CFB tokens at 4 QU each - using real working configuration
const result = await runQXBidOrder({
  rpc: "https://testnet-rpc.qubic.org/",
  seed: "fwqatwliqyszxivzgtyyfllymopjimkyoreolgyflsnfpcytkhagqii",
  sourcePublicKey: "YOUR_PUBLIC_KEY_HERE",
  contractAddress:
    "BAAAAAAAAAAAAAAAAAAAAAAAAAAAAAAAAAAAAAAAAAAAAAAAAAAAAAAARMID",
  issuer: "QXMRTKAIIGLUREPIQPCMHCKWSIPDTUYFCFNYXQLTECSUJVYEMMDELBMDOEYB",
  assetName: "CFB",
  price: 4,
  numberOfShares: 100,
  targetTick: currentTick + 30,
});
This will lock 400 QU in escrow and create a buy order for CFB tokens.
Complete Functions Reference
Here are the complete functions assembled from all the explained fragments:
createQXBidOrderPayload (Complete)
function createQXBidOrderPayload({ issuer, assetName, price, numberOfShares }) {
  // Total payload size:
  // id issuer = 32 bytes
  // uint64 assetName = 8 bytes
  // sint64 price = 8 bytes
  // sint64 numberOfShares = 8 bytes
  // Total = 56 bytes
  const packageSize = 56;

  const builder = new QubicPackageBuilder(packageSize);

  // 1. issuer (id = PublicKey, 32 bytes)
  builder.add(new PublicKey(issuer));

  // 2. assetName (uint64, 8 bytes)
  // Convert string to number if necessary
  let assetNameValue;
  if (typeof assetName === "string") {
    // Convert string to uint64 (example: "CFB" -> number)
    const encoder = new TextEncoder();
    const bytes = encoder.encode(assetName.padEnd(8, "\0"));
    const view = new DataView(bytes.buffer);
    assetNameValue = view.getBigUint64(0, true); // little endian
  } else {
    assetNameValue = BigInt(assetName);
  }
  builder.add(new Long(assetNameValue));

  // 3. price (sint64, 8 bytes)
  builder.add(new Long(BigInt(price)));

  // 4. numberOfShares (sint64, 8 bytes)
  builder.add(new Long(BigInt(numberOfShares)));

  const payload = new DynamicPayload(packageSize);
  payload.setPayload(builder.getData());

  return payload;
}
runQXBidOrder (Complete)
export async function runQXBidOrder({
  rpc,
  seed,
  sourcePublicKey,
  contractAddress,
  issuer,
  assetName,
  price,
  numberOfShares,
  targetTick,
}) {
  // Create payload for AddToBidOrder (inputType 6)
  const payload = createQXBidOrderPayload({
    issuer,
    assetName,
    price,
    numberOfShares,
  });

  // Calculate total amount (price * numberOfShares)
  const totalAmount = price * numberOfShares;

  // Create transaction
  const transaction = new QubicTransaction()
    .setSourcePublicKey(new PublicKey(sourcePublicKey))
    .setDestinationPublicKey(new PublicKey(contractAddress))
    .setTick(targetTick)
    .setInputType(6) // AddToBidOrder
    .setInputSize(payload.getPackageSize())
    .setAmount(new Long(BigInt(totalAmount)))
    .setPayload(payload);

  // Sign transaction
  await transaction.build(seed);

  // Send transaction
  const result = await broadcastTransaction(transaction, rpc);

  return {
    transaction: {
      sourcePublicKey,
      destinationPublicKey: contractAddress,
      tick: targetTick,
      inputType: 6,
      amount: totalAmount,
      inputSize: payload.getPackageSize(),
    },
    payload: {
      issuer,
      assetName,
      price,
      numberOfShares,
    },
    broadcast: result,
  };
}
broadcastTransaction (Complete)
async function broadcastTransaction(transaction, rpcUrl) {
  const encodedTransaction = transaction.encodeTransactionToBase64(
    transaction.getPackageData()
  );

  const request = {
    encodedTransaction: encodedTransaction,
  };

  const response = await fetch(`${rpcUrl}v1/broadcast-transaction`, {
    method: "POST",
    headers: {
      "Content-Type": "application/json",
    },
    body: JSON.stringify(request),
  });

  if (!response.ok) {
    throw new Error(`HTTP error! status: ${response.status}`);
  }

  return await response.json();
}
Common Pitfalls and Debugging
Payload Size Errors
Problem: Transaction rejected with "invalid input size"
Solution: Double-check your C++ struct size calculation:
AddToBidOrder: exactly 56 bytes- Use
payload.getPackageSize()to verify
Insufficient QU Balance
Problem: Transaction fails with insufficient balance
Solution: For bid orders, you need price × numberOfShares QU available plus any transaction fees.
Wrong Tick Timing
Problem: Transaction never executes
Solution: Use adequate tick offset (30+ for smart contracts) and verify current tick before sending.
7. Testing Custom Smart Contracts
When interacting with custom smart contracts:
- For custom contracts not yet deployed on mainnet, initial testing should be done through a testnet node. Refer to the Testnet Resources for information on testnet nodes and faucets.
- After verifying your contract works correctly, you can integrate it with frontend applications following the patterns in the example applications.
8. Best Practices
- Error Handling: Always implement robust error handling for RPC calls
- Security: Never expose private keys in client-side code; use proper wallet integration
9. Further Reading
For additional context and deeper understanding of the Qubic ecosystem, explore:
- Smart Contract Architecture – Full details on how contracts are structured and registered in Qubic, their source code, and the identification system.
- Ticks and Concurrency – Explanation of the “tick” paradigm, transaction scheduling, and per-identity concurrency limits.